Overview:
This is the schematic for the Control panel. It was designed using Corel draw 12 and printed on 3 A4 sheets of sticky Vinyl Paper so that the final panel measures 630mm*300mm.
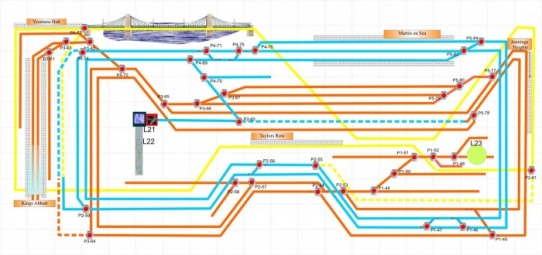
The layout is going to have three levels.
Orange : Level 1 : The track is laid for this level. There are two continuous tracks with a small goods yard, a terminus station (Kings Abbott), a turntable (L23), and the lower level of the Hornby Conveyor {L22). Blue : Level 2 : The track is laid for most of this level. There are two continuous tracks, a siding and a through station (Martin on Sea) with centre track. The tipper (L21) feeds the conveyor (L22).
Yellow : Level 3: I just had to have a Hornby Suspension bridge on my layout, just because it looks so good! So the bridge is there together with a few girded bridges but as yet, it doesn't go anywhere. Even though this level will be a single continuous loop, the plan is to use a shuttle (from CML Electronics) so that my Bachmann DMU can travel back and forth between the two stations. (Taylors Row and Jennings Heights)
